Easy Steps to Transfer Spotify Playlists to TIDAL
Spotify boasts a music library of over 100 million tunes ranging from single songs, albums, playlists, podcasts, and audiobooks. Despite the vast collection, any Spotify music has only up to lossy 320kbps quality, which has been the major reason why people switch to TIDAL, a popular music platform for its lossless HiFi and HiRes music. However, it can be frustrating when you switch from Spotify to Tidal and find that your meticulously curated playlists and saved tracks don't transfer easily. Fear not, because we have solutions for you! In this article, we will guide you through the process of transferring your Spotify music to Tidal hassle-free with a few simple steps. Let's get started!

Part 1. Transfer Spotify Playlists to TIDAL by Online Tools
Transferring your music library from Spotify to TIDAL may seem like a daunting task, but with the right tools and techniques, it can be a straightforward process. Once complete, you can play your Spotify playlists on TIDAL and enjoy higher audio quality. Here's a step-by-step guide on how to transfer your Spotify music to Tidal by using online tools.
Part 1-1: Transfer Spotify Music to TIDAL by TuneMyMusic
STEP 1 Go to the TuneMyMusic website, a popular online tool for music transferring between platforms, and click on "Let's start".
STEP 2 Select Spotify as the source, log into your Spotify account, and confirm to authorize the website to link your account.
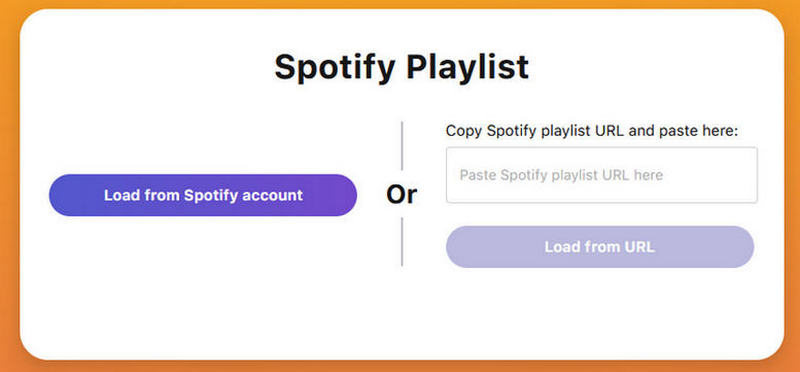
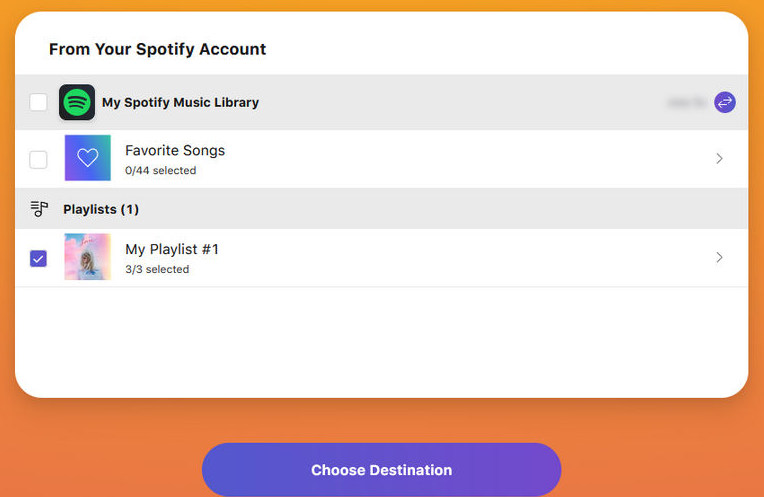
STEP 3 Click on the button "Load from Spotify account" to let the website read your source playlists. You can also copy and paste the playlist link.
STEP 4 Confirm your playlists and click on the "Choose Destination" button.
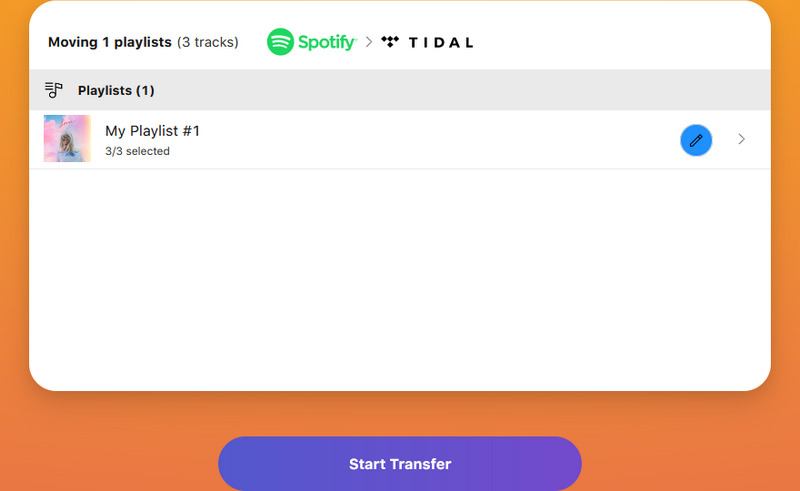
STEP 5 Select TIDAL from the provided options and log into your TIDAL account.
STEP 6 Desigante a TIDAL location for your Spotify playlists and click on "Start Transfer".
Part 1-2: Transfer Spotify Music to TIDAL by Soundiiz
STEP 1 Go to Soundiiz, another popular website for music transfer, and log in with your Spotify account.
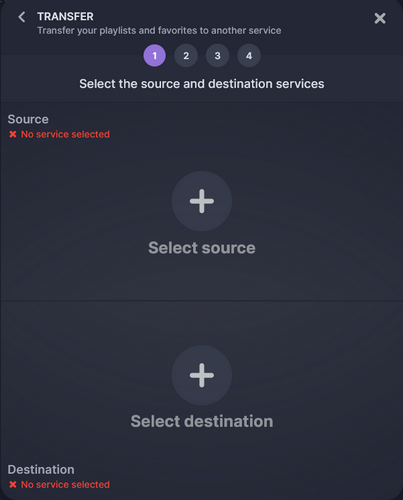
STEP 2 Select "Transfer" under the Tools tab and select Spotify as the source.
STEP 3 Click to select TIDAL as the destination and log into your TIDAL account.
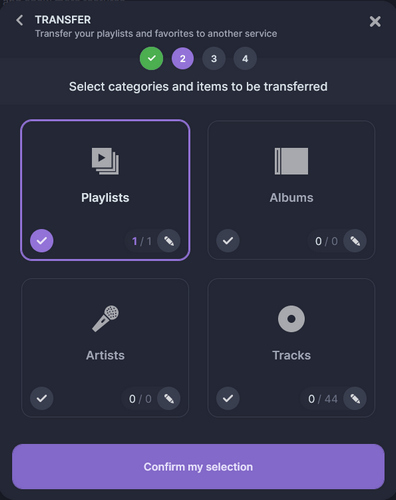
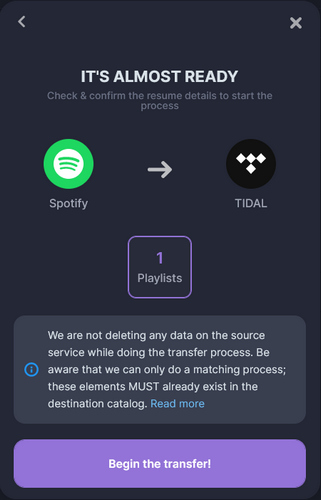
STEP 4 Click on "Start", select the source playlist, album, etc., and click "Confirm my selection".
STEP 5 Follow the tips to configure your playlists and click "Save configuration".
STEP 6 Pick the listed tracks from your Spotify playlists, click on "Confirm" and "Begin the transfer!" to start syncing your Spotify playlist to TIDAL.
Part 2. Download Transferred Spotify Playlists to Desktop Computers
What is known to all is that no matter whether Spotify or TIDAL you use, a free or a paying user you are, you cannot enjoy music outside either of them. Spotify and TIDAL binds their music to their web players or apps and restricts their users from using their music outside of the platforms. That means you cannot transfer Spotify or TIDAL music to USB for offline listening on the go, or upload Spotify or TIDAL music to DJ software for mixing. But don't worry, this issue gets resolved now.
Tidabie Tidal Music Converter is specially designed for Tidal users, free or paid, to extract Tidal music to local computers, and convert Tidal music MP3, AAC, FLAC, and other common formats at a high speed, while losslessly keeping up to 100% Hi-Res audio quality and complete ID3 tags. With this program, you can get rid of the restrictions posed by TIDAL, enjoy lossless high-quality music offline without subscriptions, and transfer TIDAL music to devices and programs.
Tidabie Tidal Music Converter
- Download Tidal songs/albums/playlists/podcasts locally.
- Convert Tidal tracks to MP3/AAC/WAV/FLAC/AIFF/ALAC.
- Preserve Tidal Hi-Res/CD audio quality and full ID3 tags.
- Run at 10x speed & batch download Tidal playlists.
- Sort Tidal music files by playlist, album, artist, etc.
- Offer tools of Format Converter, Tag Edit, etc. & save lyrics.
- Enjoy Tidal music offline on devices and programs.
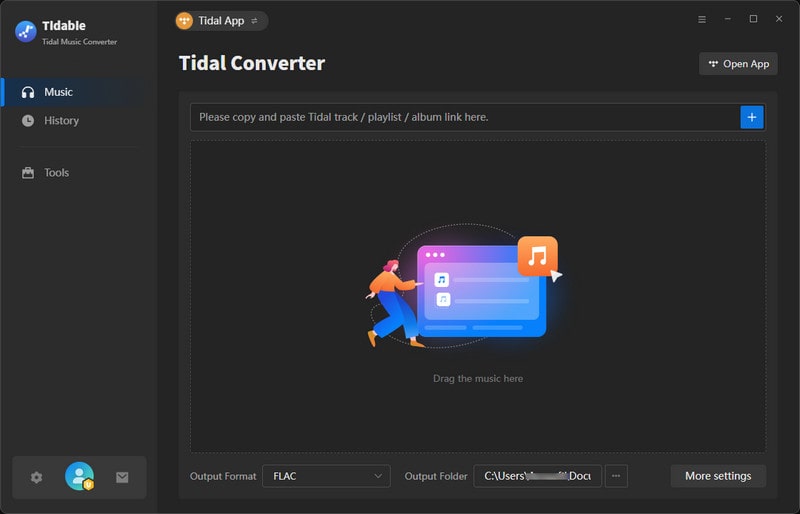
STEP 1 Run Tidabie and Choose an Audio Source
After opening Tidabie, select an audio source from the TIDAL app and the Tidal web player. The app source requires the TIDAL app to work and save lossless Tidal HiFi and HiRes music, while the web player source works by the built-in Tidal web player and downloads Tidal HiFi music at 10x faster speed.
STEP 2 Select Tidal Music to Download
If you use the app source, the TIDAL app will open automatically. Log into your account and drag and drop the transferred Spotify playlists from the app to Tidabie. The other way to add the music is to copy and paste the link.
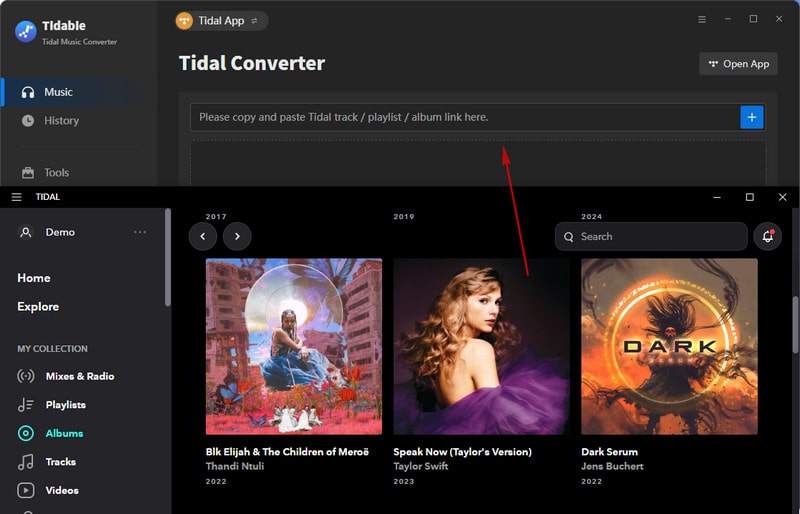
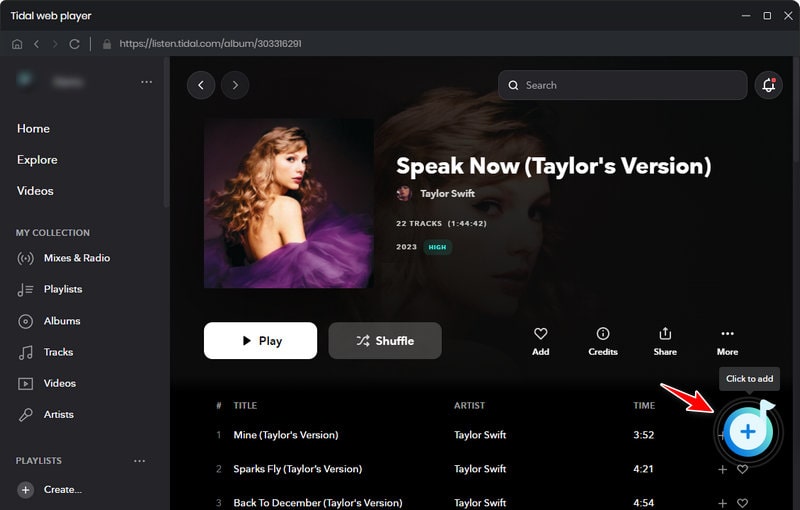
If you use the web player source, your screen will show the Tidal web player. Log into your account and open the synced Spotify playlist or album on the web player. Click on the blue "+" icon floating on the bottom right to let Tidabie read the tracks.
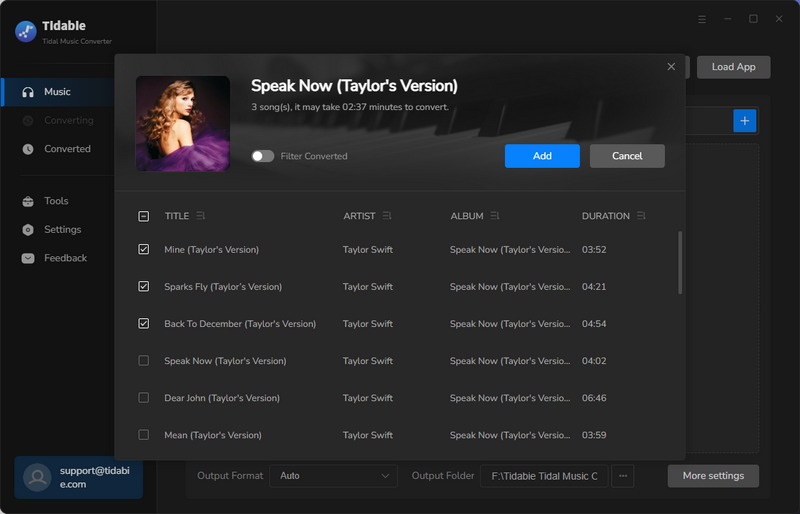
You will see a pop-up window that lists all the available Tidal tracks. Pick your songs and click on "Add". In case of adding more Tidal music, do this step again.
STEP 3 Customize Output Parameters for Tidal Music
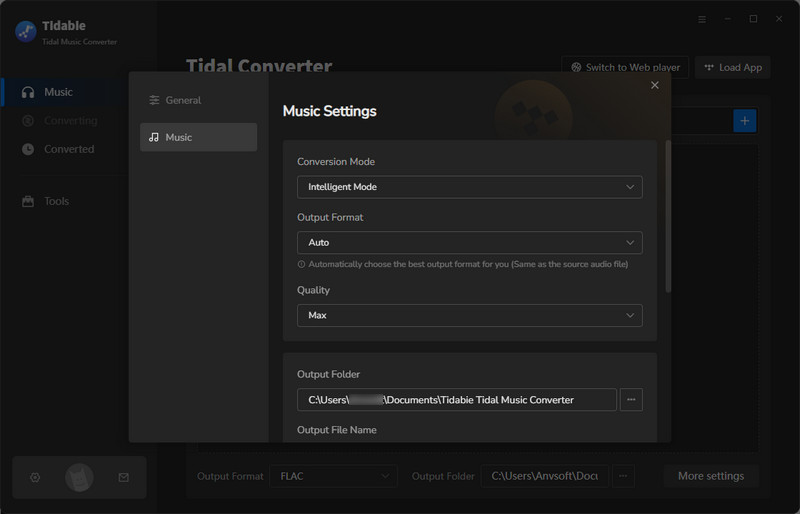
Go to "Settings" from the lower left. Choose an output format, output quality, and output folder, name the output files with the options, and select how to organize the output files. Remember to check the box if you want to save Tidal lyrics. Attention, to save HiFi or HiRes music, you need to select 'Tidal Record' or 'Web Download' conversion mode, and 'Auto' or 'FLAC output format.
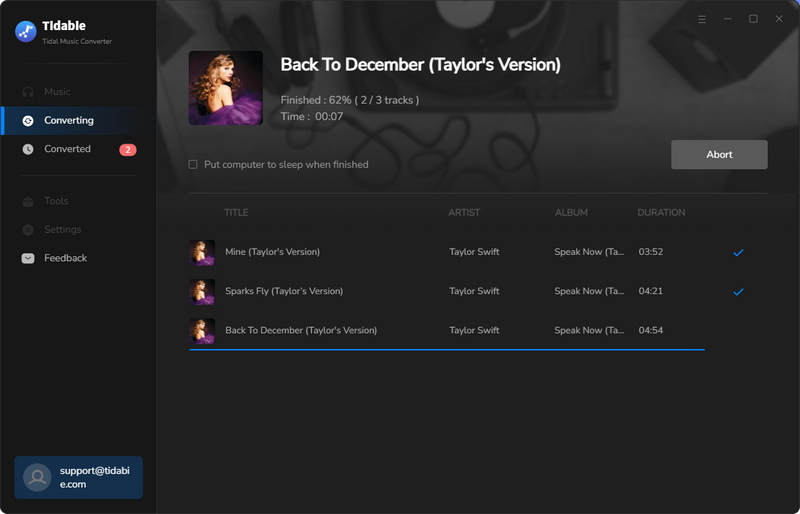
STEP 4 Losslessly Download Tidal Music to Local Drive
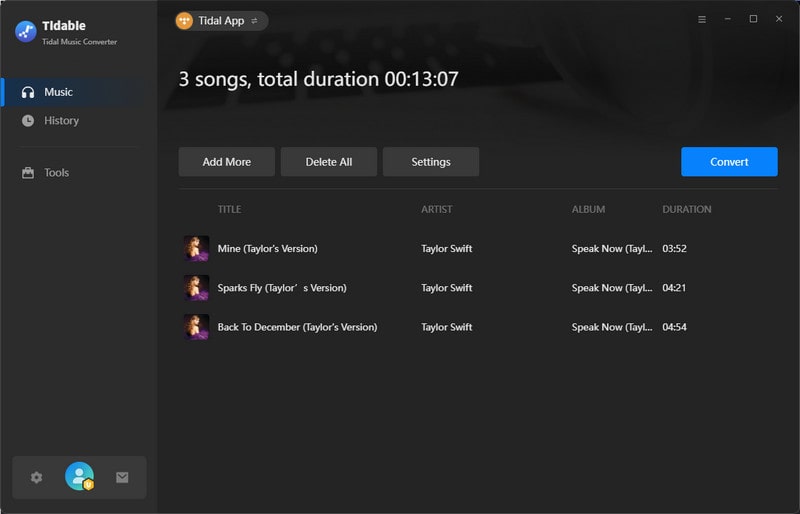
Click on "Convert" under the Home tab and Tidabie will process the tracks at up to 10x faster speed while keeping the original quality in cutting-edge technology. Once complete, you can find Tidal music files in your designated output folder. Thereafter, you can transfer Tidal music to USB or import it to DJ software for mixing.
Extra Tip: Download Any Spotify Music to MP3
Alternatively, if you want to download Spotify music to MP3 files for permanent offline listening, TunePat Music One comes to be the best option. TunePat Music One is an all-in-one music converter that works for various platforms, including but not limited to Spotify, Apple Music, Amazon Music, Deezer, etc. Similar to Tidabie, it can swiftly download music to local folders and convert any tunes to plain MP3, AAC, WAV, AIFF, ALAC, and FLAC formats. While losslessly preserving 1:1 audio quality, TunePat wisely retains full ID3 tags and track lyrics. Let's take a look at how it downloads Spotify music to MP3.
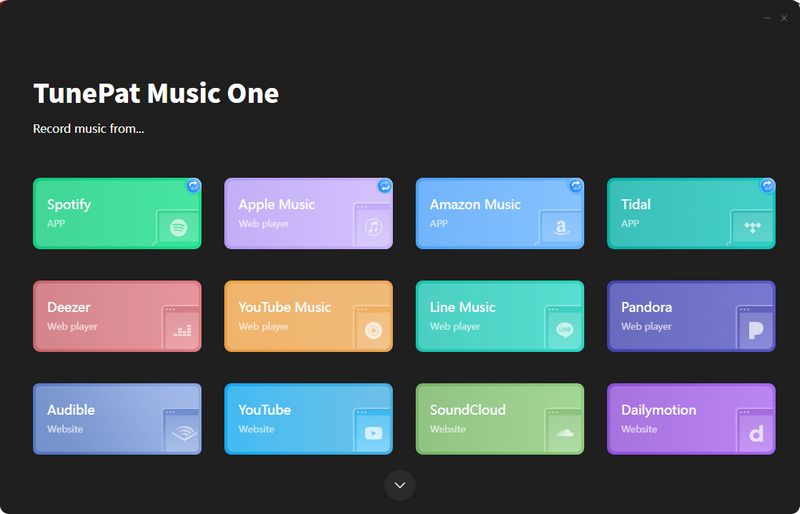
STEP 1 Run TunePat Music One and Select an Entrance
After downloading and installing the program, run TunePat Music One on your computer. Choose a Spotify audio source from the main interface. If you select the app source, you should have a Spotify app, while the web player source does not need the app. Once the Spotify app or web player occurs, log into your account to let TunePat access the library.
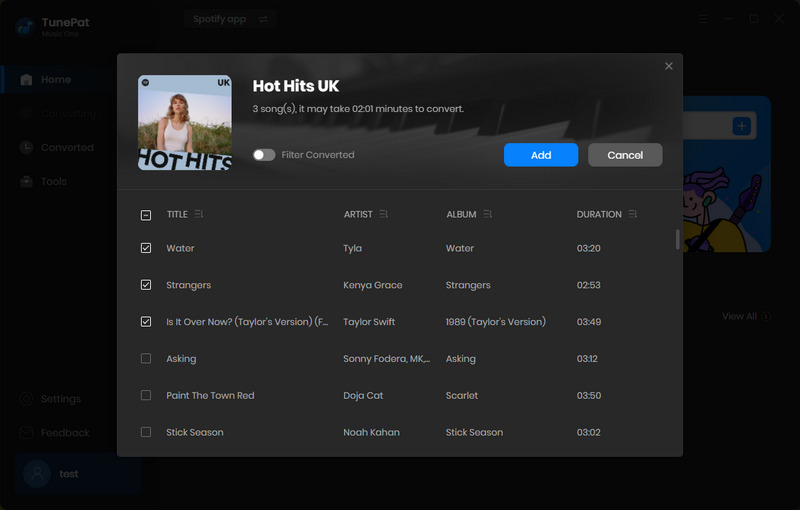
STEP 2 Add Spotify Music to TunePat
No matter the Spotify app or web player you are using, navigate to your wanted music and open it. You can see a blue "+" icon in the bottom right. Click on it to inform TunePat to parse and load the songs. Tick off the specific tracks and hit on "Add" on the smaller window.

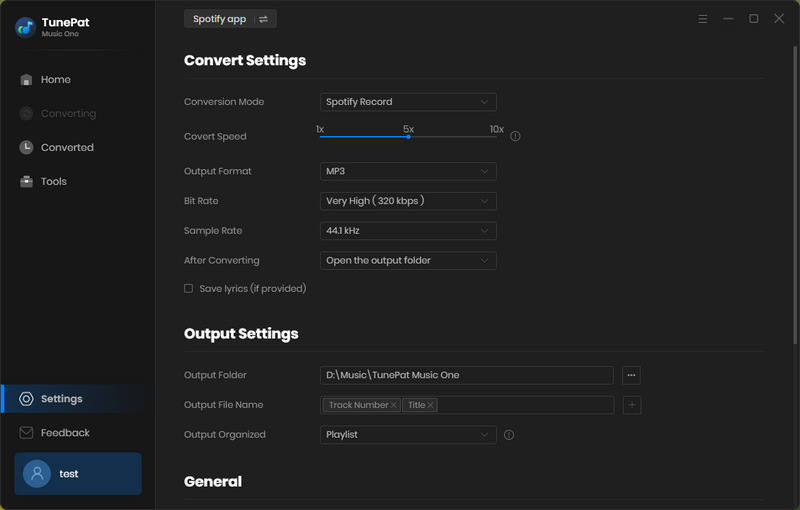
STEP 3 Change Output Parameters on TunePat
Go to the "Settings" panel. Choose the MP3 output format, designate an output folder, and make other settings as you wish. If you want to save Spotify lyrics, simply check the box.
STEP 4 Download Spotify Music to MP3
Now head to the Home tab and click on "Convert" to start downloading Spotify music to MP3. During the conversion, the original quality up to 320kbps gets well preservation. The progress is soon complete, and the output folder will pop up automatically. You will see the downloaded Spotify MP3 music files. Now, enjoy music freely.


Summary
Transferring Spotify playlists to TIDAL by online tools allows you to keep your Spotify playlists while switching platforms and listen to higher-quality audio. But this way does not bring a permanent offline listening to your Spotify playlists. So it is necessary to use the TunePat Music One to download your Spotify playlists to your local drive. Alternatively, if you want higher-quality music, you may use the Tidabie Tidal Music Converter to download the transferred Spotify playlists from TIDAL, to get audio files with HiFi and HiRes qualities and realize the perpetual offline listening and free use of Tidal music.