How to Use Tidabie Tidal Music Converter
Tidabie Tidal Music Converter is the best solution to help Tidal users to download any song to plain MP3/AAC/FLAC/WAV/AIFF/ALAC at up to 10X faster speed with 100% original audio quality kept. Tidabie can download Tidal songs with even high-fidelity quality (16-bit/44.1kHz) retained and high resolution quality (up to 24-bit/192kHz).
 Download the PDF User Manual of Tidal Music Converter
Part 1. How to Register Tidabie Tidal Music Converter
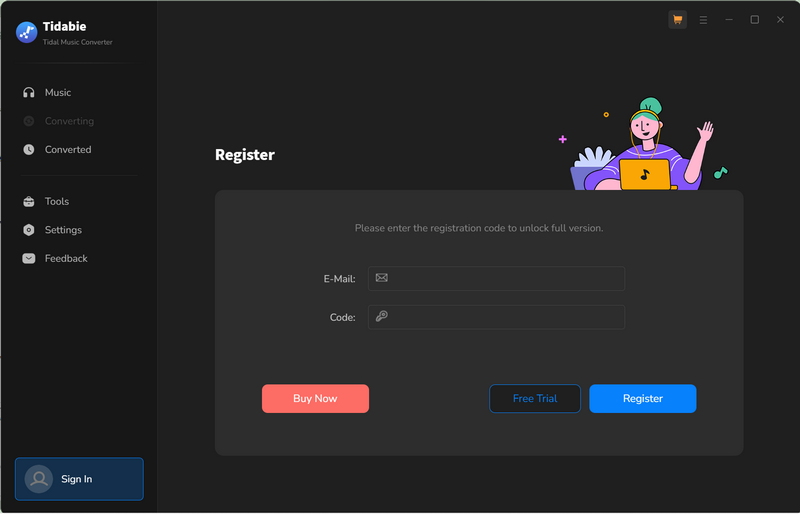
STEP 1 Run Tidabie Tidal Music Converter on your computer and move to the lower left corner to click on the register section as below.
STEP 2 Copy and paste the registration Email and Code you received into the registration popup window. And then click on the "Register" button.
Part 2. How to Download Tidal Music onto Computer with Tidabie
With the most to-to-date audio recording core, Tidabie Tidal Music Converter is born to convert any songs, albums, artists, playlists, and podcasts from Tidal Music to plain MP3, AAC, FLAC, WAV, AIFF, and ALAC formats. After conversion, you can enjoy Tidal music on all of your devices without any limitations.
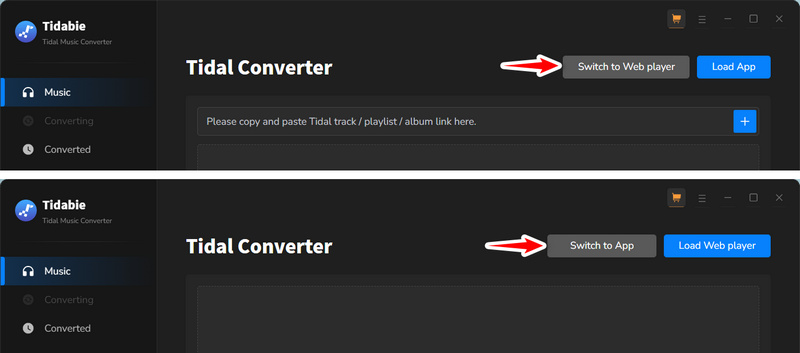
Tidabie currently supports both the Tidal app and Tidal web player. The former mode can keep up to Master/Max quality (Hi-Res or 24-bit/192kHz) at 5x the speed, whereas the web player mode can retain up to HiFi/High quality (CD quality or 16-bit/44.1kHz) at up to 10x fast speed. And the operations are a bit different, and we will show them respectively.
Note: If the Tidal app does not show up, just hit the "Open App" icon in the upper right corner to open it manually. Similarly, if you want to switch the recording source from the web player to the app, hit the "Tidal web player" icon at the top center of the window, then click "Tidal App".
Part 2.1. Download Tidal Music with TIDAL App
STEP 1 Log In to Tidal Music Account
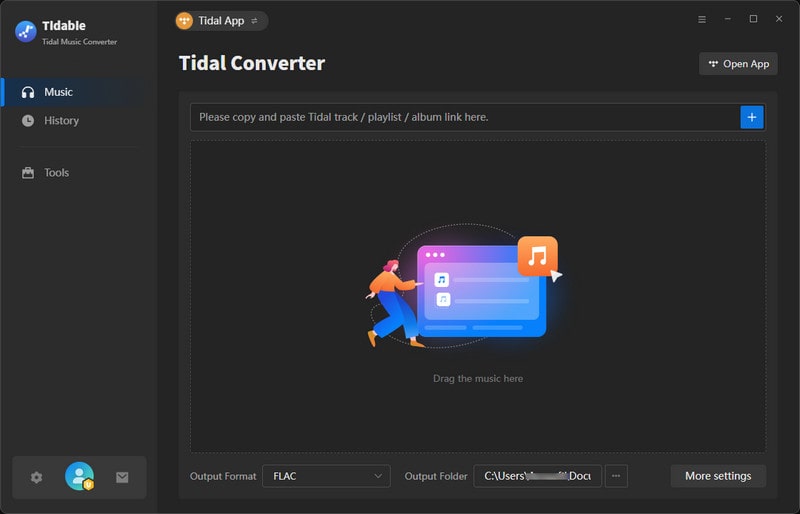
Run Tidabie Tidal Music Converter. After selecting the app download mode, Tidabie will apply the app mode interface and the pre-install TIDAL app will automatically launch. Log into your Tidal Music account on the app.
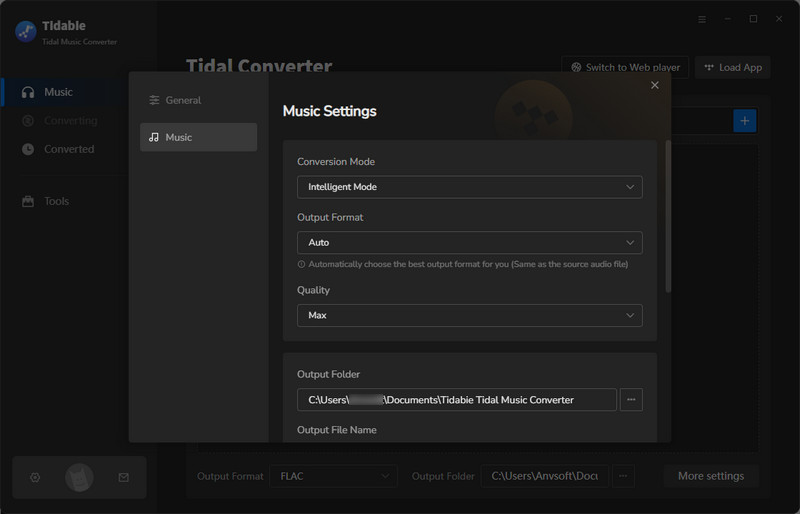
STEP 2 Customize Output Settings
Before downloading, click the "Settings" section in the lower left corner to customize the output parameters.
- Conversion Mode: Intelligent Mode, Convert Mode, YouTube Mode
- Output Format: Auto, MP3, AAC, WAV, FLAC, AIFF, ALAC
- Bit Rate: 320kbps, 256kbps, 192kbps, 128kbps
- Sample Rate: 44.1kHz, 48kHz, 96kHz, 192kHz
- Output File Name: Track Number, Title, Artist, Album, Playlist Index, Year
- Output Organized (way): None, Playlist, Artist, Album, Artist/Album, Album/Artist, Playlist/Artist, Playlist/Album
- Bit Depth: 16-bit, 24-bit (when choosing the FLAC, ALAC, WAV, AIFF formats)
- Quality: Max, High, Low (when choosing the "Auto" format)
When choosing "Auto" or "FLAC" as the output format, the output sound quality will come out to the HiFi/CD or Master/Hi-Res level as original. Besides, it is recommended to choose "Record Mode" as the conversion mode. In addition, Tidabie will save the lyrics after you tick the "Save lyrics(if provided)" box.
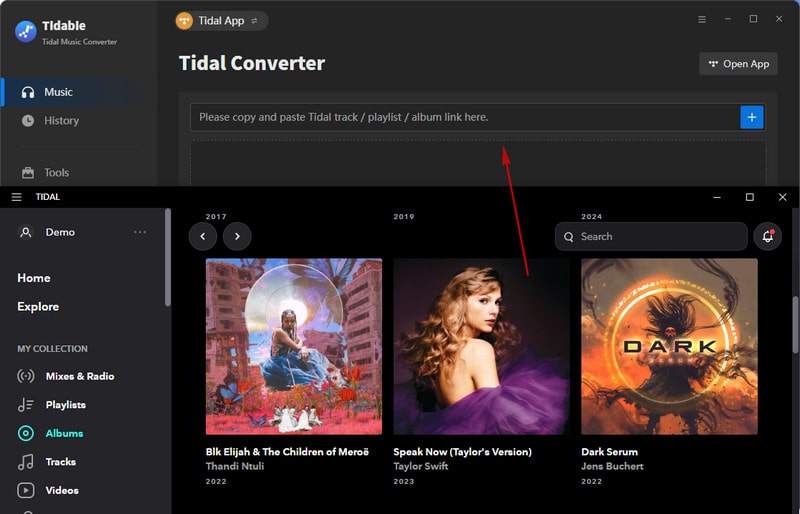
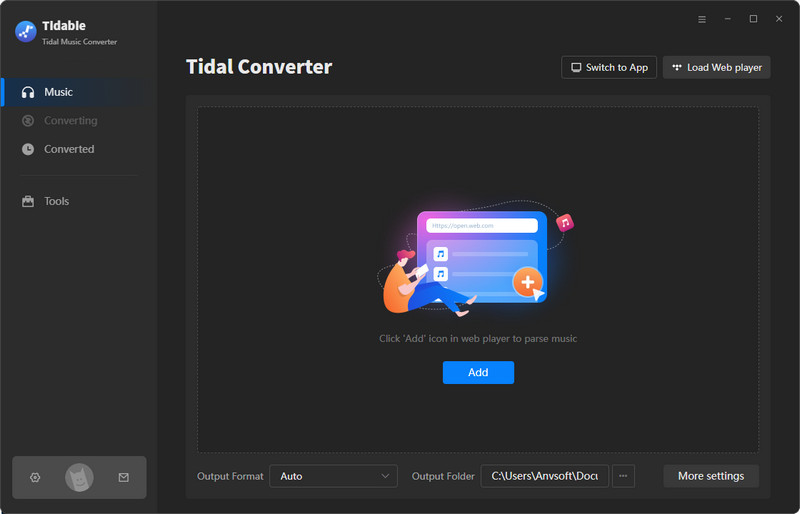
STEP 3 Add Tidal Music Songs to Tidabie
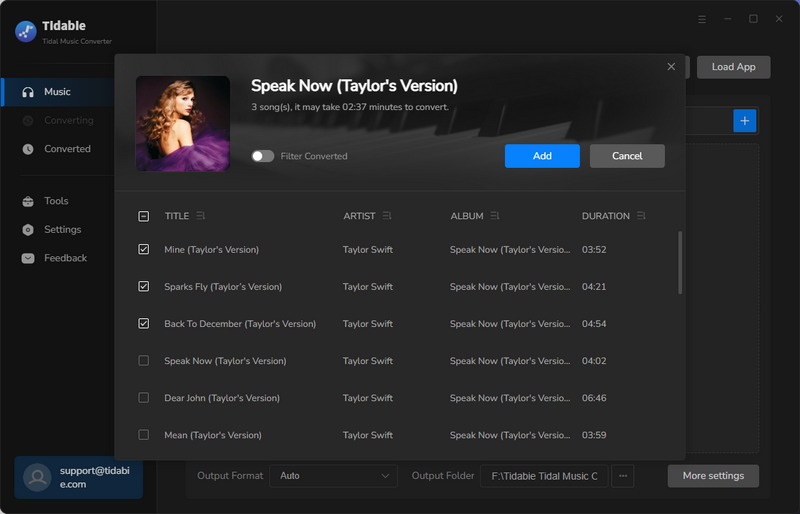
Browse the TIDAL app on your computer, go to your target songs, playlists, albums, or podcasts, click and hold on to the title, and drag and drop it right into the space on the Tidabie interface. You can copy the track link and paste it into the parse bar. Or you can also hit on the "Click to add" button to parse the playlist, album or any track you like. Tidabie will then parse the link and display the songs on a popup, where you can pick the songs. Then hit on "Add" to confirm.
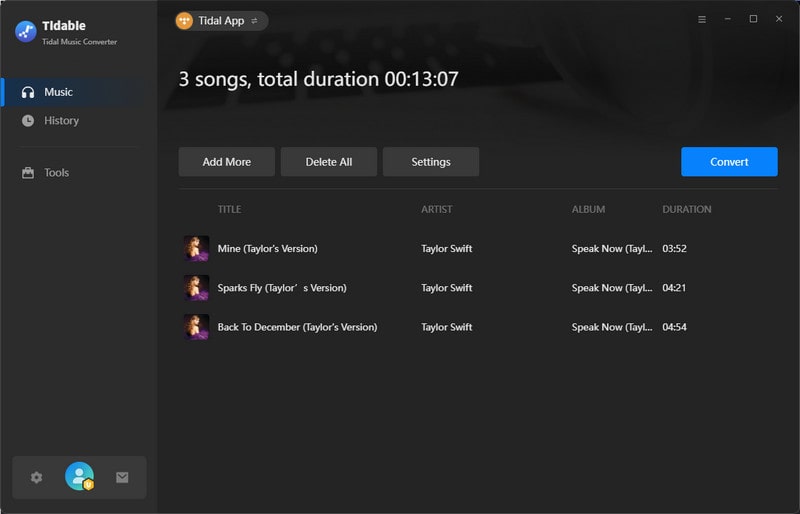
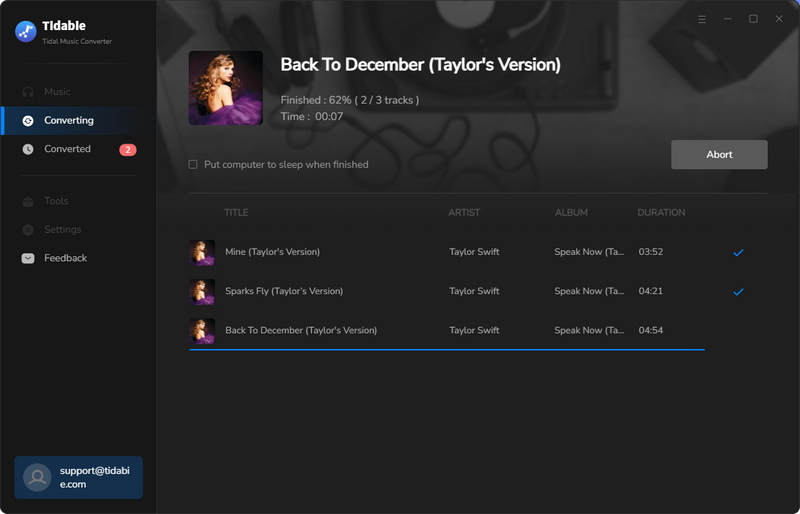
STEP 4 Start Converting Tidal Music Songs
If you plan to add more songs to this download batch, simply repeat the previous step. Then you can click on "Convert" to start converting the Tidal songs to plain format at up to 5x fast speed.
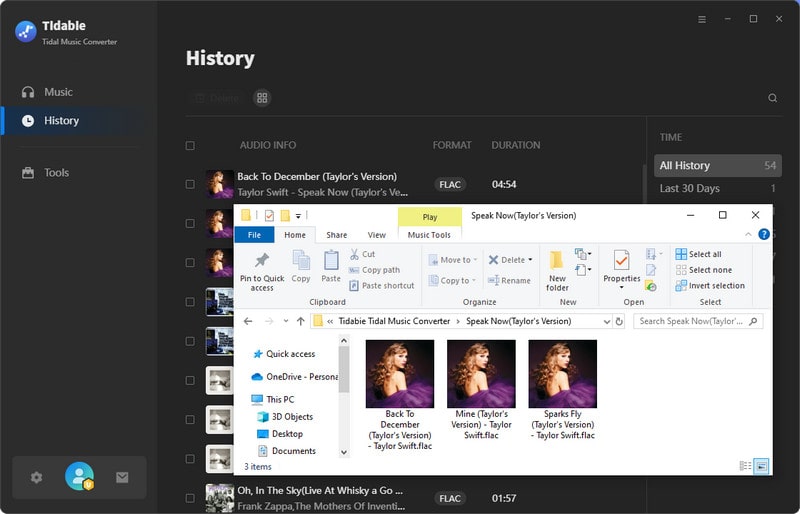
STEP 5 Check Converted Tidal Music Songs
When the conversion is done, you can go to the "History" module to check your download history. There you can play the songs, click on the file icon to open the output folder, burn them to CD, etc.
Part 2.2. Download Tidal Music with Tidal Web Player
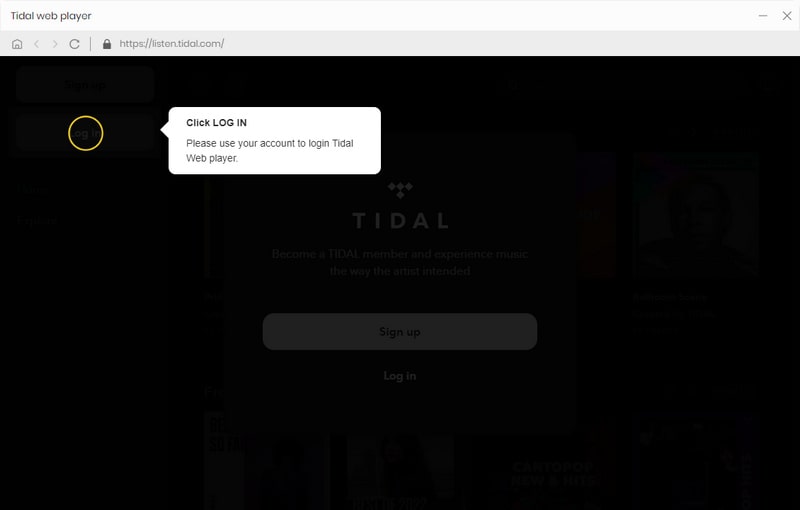
STEP 1 Sign In to Tidal Music Account
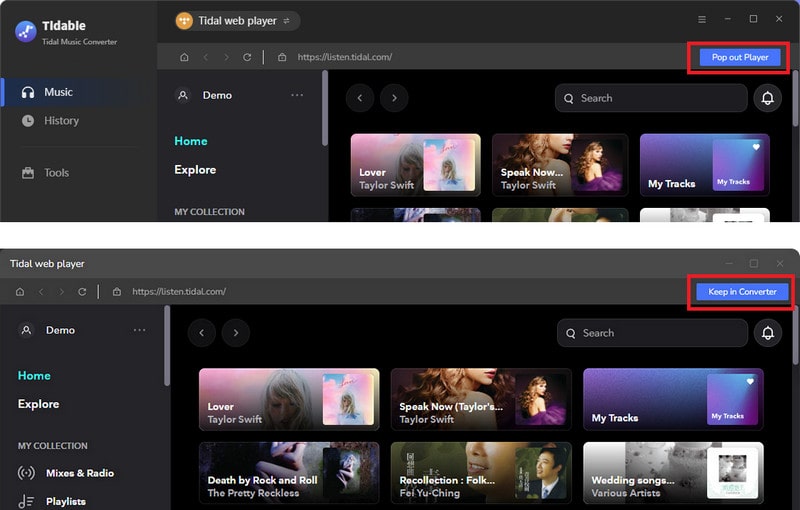
Run Tidabie Tidal Music Converter. After selecting the web player download mode, the Tidal web player will pop up on the screen. Follow the instructions to log into your Tidal Music account.
To keep the Tidal web player within Tidabie Tidal Music Converter, click the blue "Keep in Converter" icon in the upper-right corner. To use a standalone Tidal web player window, click "Pop out Player".
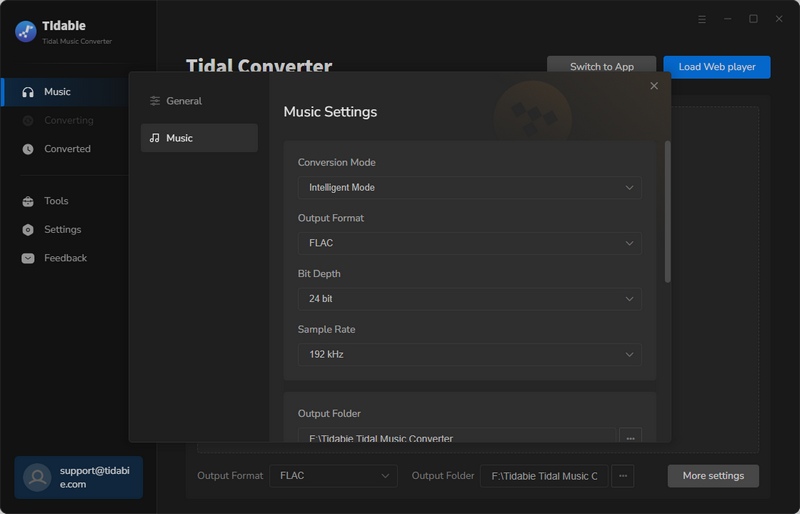
STEP 2 Change Output Settings
Before downloading, back to the Tidabie interfacec, click the "Settings" section in the lower left corner to customize the output parameters.
- Conversion Mode: Intelligent Mode, Convert Mode, YouTube Mode
- Output Format: Auto, MP3, AAC, WAV, FLAC, AIFF, ALAC
- Bit Rate: 320kbps, 256kbps, 192kbps, 128kbps
- Sample Rate: 44.1kHz, 48kHz, 96kHz, 192kHz
- Output File Name: Track Number, Title, Artist, Album, Playlist Index, Year
- Output Organized (way): None, Playlist, Artist, Album, Artist/Album, Album/Artist, Playlist/Artist, Playlist/Album
- Bit Depth: 16-bit, 24-bit (when choosing the FLAC, ALAC, WAV, AIFF formats)
- Quality: Max, High, Low (when choosing the "Auto" format)
When choosing "Auto" or "FLAC" as the output format, the output sound quality will come out to the HiFi/CD level as original. Besides, it is recommended to choose "Record Mode" as the conversion mode. If needed, check the "Save lyrics" box to save track lyrics of the tracks.
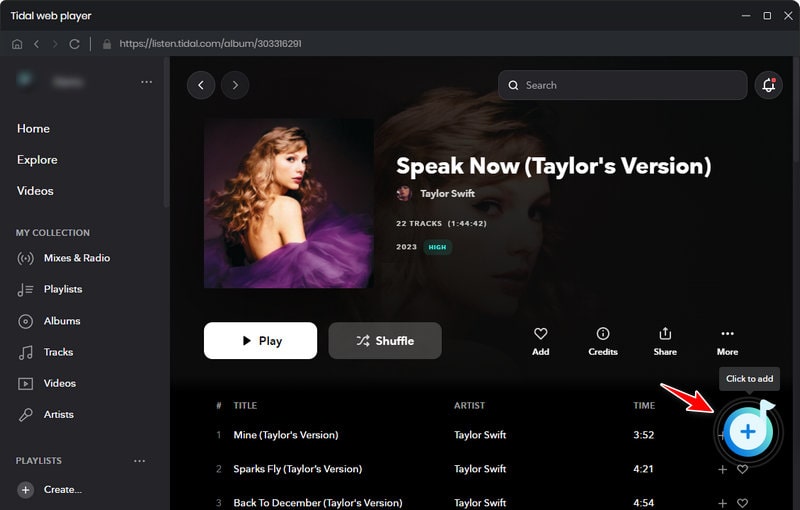
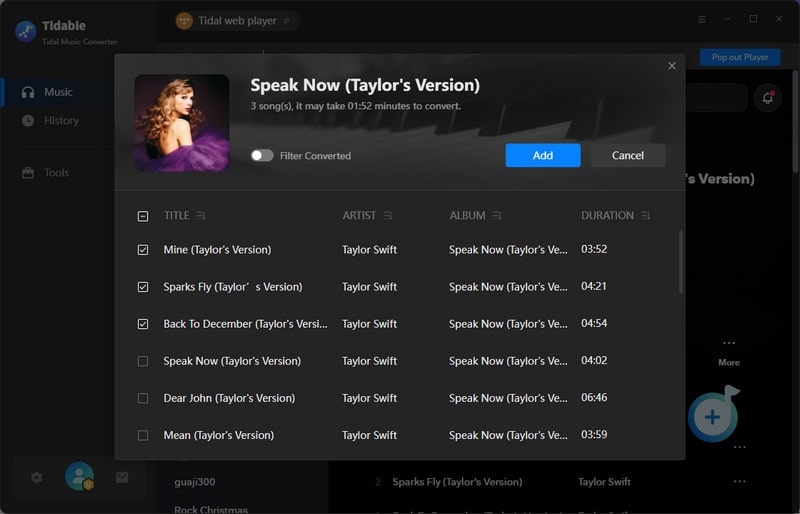
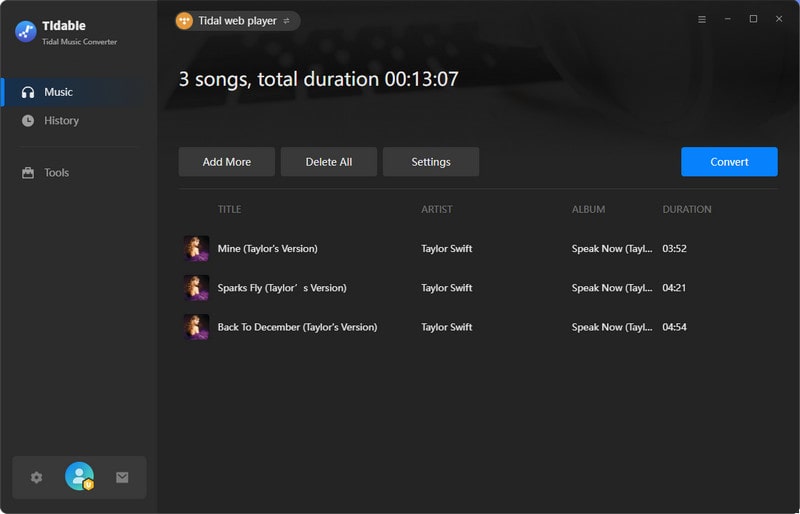
STEP 3 Add Tidal Music to Tidabie
Head to the Tidal web player on the screen, go through and open your favorite Tidal songs, playlists, albums, and other content. Click on the blue "Click to add" button. Next, pick the tracks you want to download and hit on the "Add" button.
STEP 4 Start Downloading Tidal Music to Computer
After adding all the target Tidal tracks, click on the "Convert" button to start downloading Tidal's music at once at up to 10x fast speed. And all your Tidal songs will be saved to the output path in MP3, AAC, WAV, FLAC, AIFF, or ALAC format.
If you want multiple playlists to convert in a batch, you may head to the pop-up Tidal web player, and repeat the steps to add more Tidal songs. You can also click on the "Add More" button on this page. The Tidal web player will come in front, and you can operate to add more Tidal songs.

STEP 5 Check Downloaded Tidal Music
After the conversion is complete, you can head to the "History" column to check your download history on Tidabie or open the output folder. All the converted songs can be transferred to any of your devices for permanent offline playback.
Part 2.3. Video Tutorial
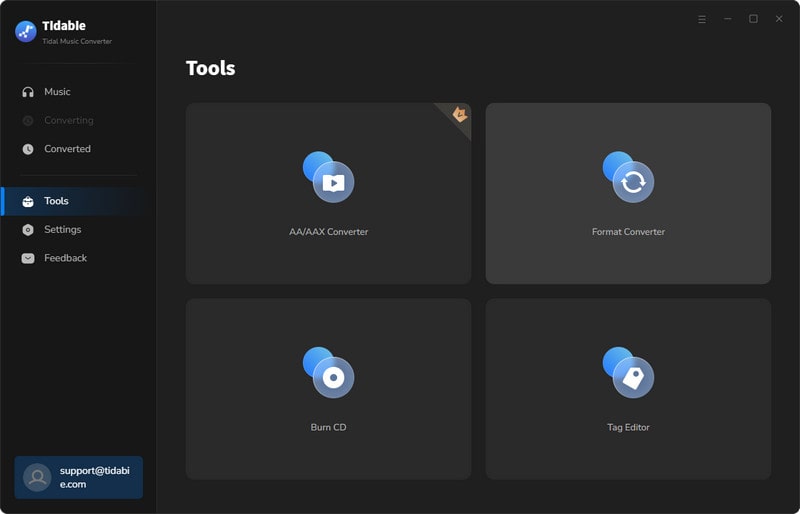
Part 3. How to Use Advanced Tools on Tidabie
Tidabie Tidal Music Converter has been improving itself to give all of you a better user experience. It offers several tools and you can enjoy more features and functions from Tidabie. Let's look at how to use the tools.
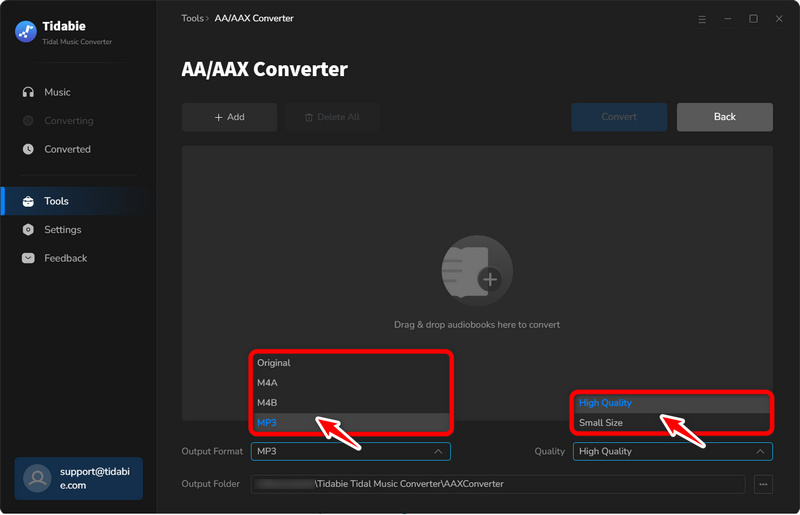
Part 3.1. AA/AAX Converter
Tidabie offers a helpful tool for converting AA/AAX audiobooks into M4A, M4B, and MP3 formats, providing users with convenient options for their audiobook conversion needs.
STEP 1 Go to the "Tools" section, and click on the "AA/AAX Converter" icon.
STEP 2 You can directly import the audiobooks AA or AAX files to the converter by clicking "+Add".
STEP 3 Set the output format (MP3/M4A/M4B), quality, and output folder before hitting the "Convert" button.
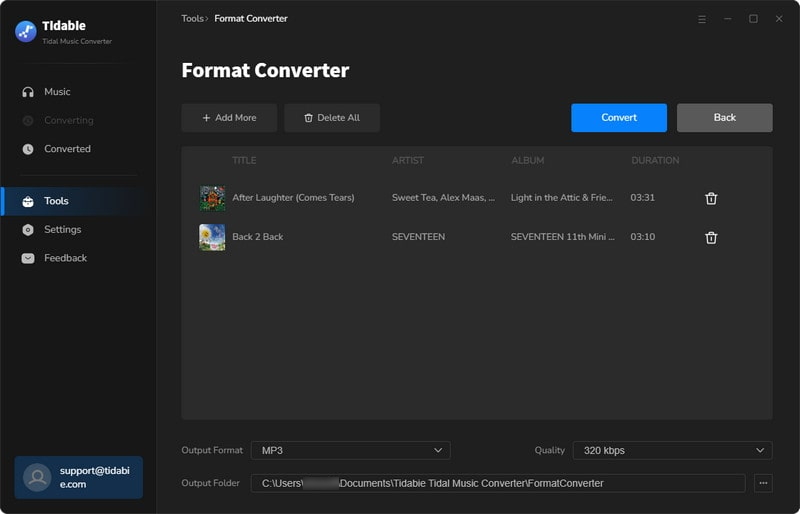
Part 3.2. Format Converter
Format Converter is a tool that allows you to convert your local audio files to other formats, such as MP3, M4A, FLAC, WAV, OGG, and AIFF.
STEP 1 Import Local Files
Firstly, head to the Tools section, and select "Format Converter". Click on the "+Add" button to open your local folders. Navigate to the audio files you'd like to convert. Select files and confirm. They will be added to Tidabie. You can also add the files by dragging and dropping. The supported source formats include MP3, M4A, M4B, WAV, FLAC, OGG, AIFF, and M4R.
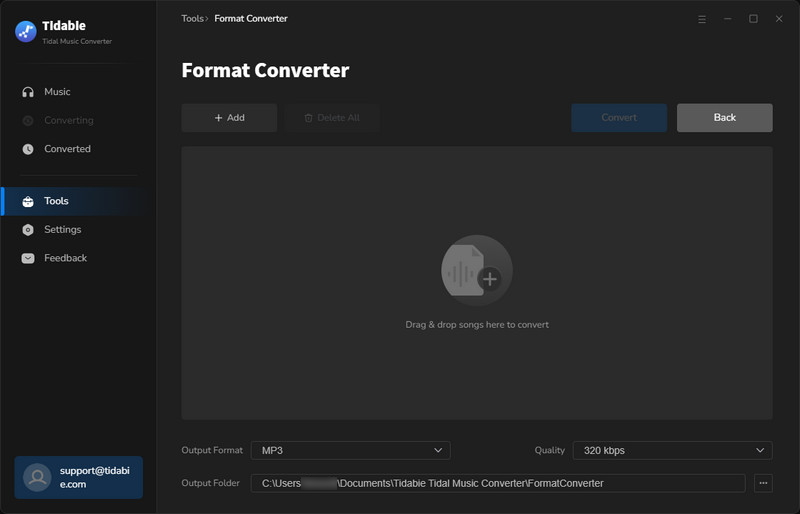
STEP 2 Change Output Settings and Convert
In this step, customize the output setting to your preference. You need to select the output format, quality, channels, and output path. When all the preparations are done, simply click on the "Convert" button to start converting your files.
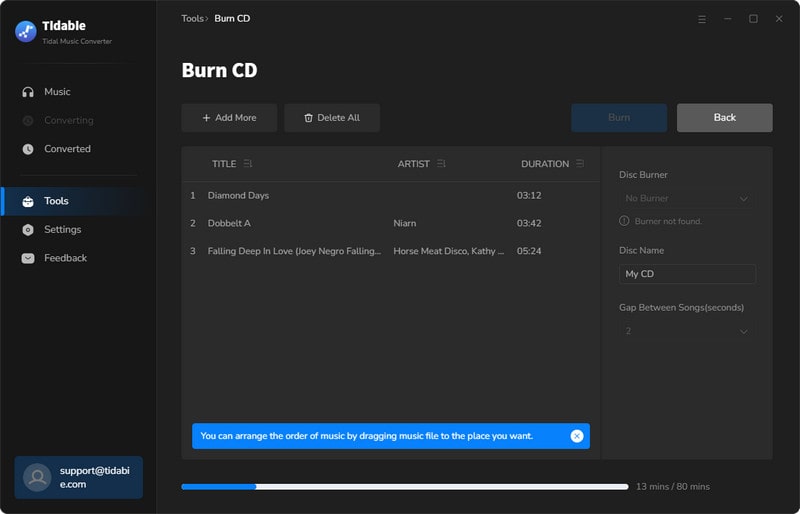
Part 3.3. Burn CD
Burning Tidal songs to CD is always a hit for many music buffs. Hence, Tidabie provides a burning CD function for giving you the facility to the largest extent.
STEP 1 Select Audio Files to Burn
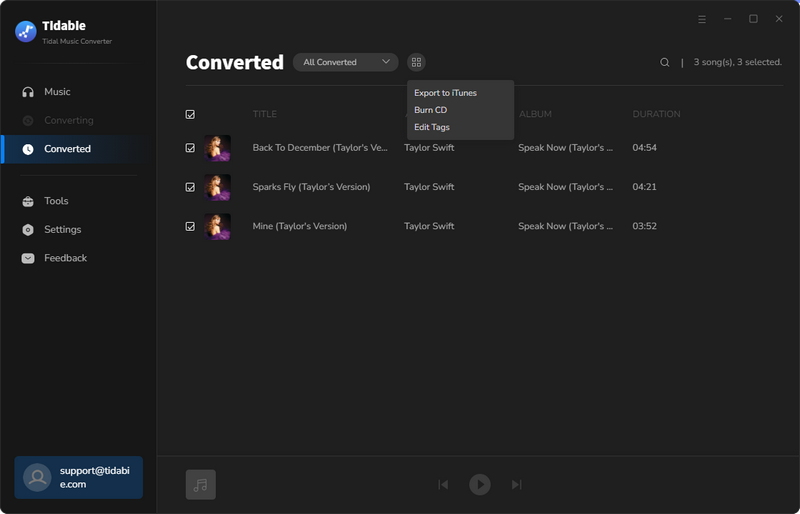
Go to the Tools, and select the "Burn CD" icon. Plug your disc into your computer. Drag and drop your target songs into the margin, or click "+Add" to browse your local folders and then add files. If you want to burn the converted Tidal songs, head to the "History" tab, pick the items, and select "Burn CD" after clicking on the above menu icon.
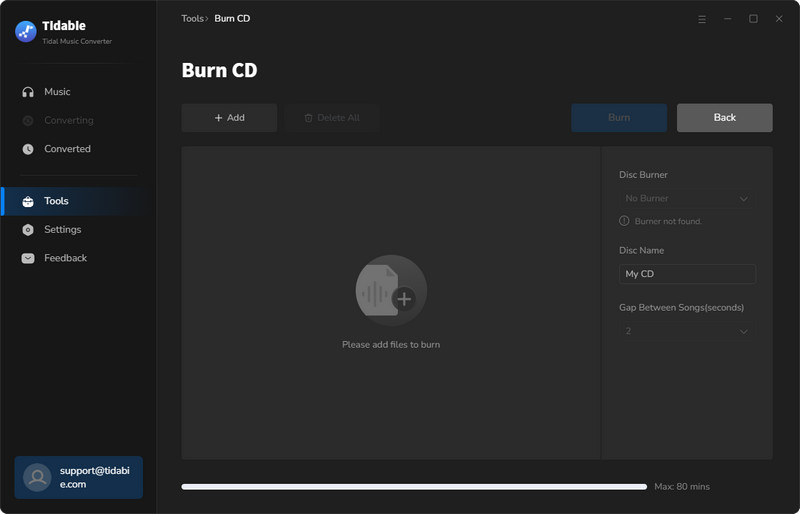
STEP 2 Make Settings Accordingly and Burn CD
Change the burning settings, like the disc name and the gap between the songs. Then simply click on the "Burn" button to start burning songs to your CD.
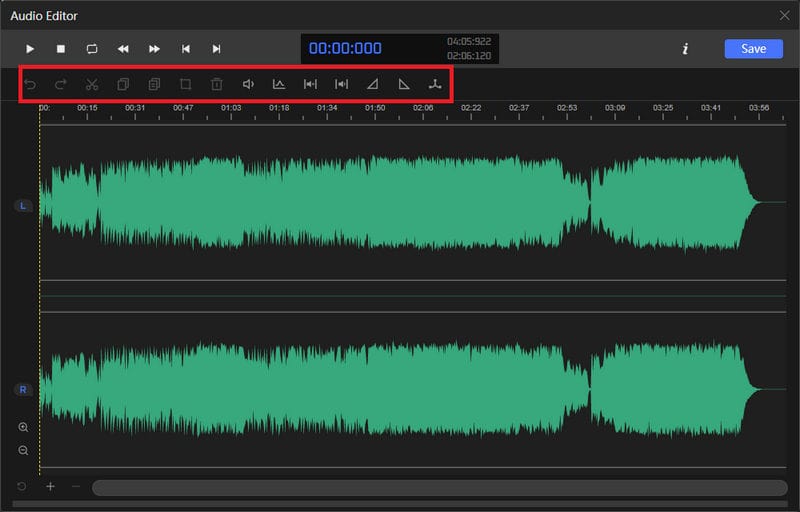
Part 3.4. Audio Editor
Audio Editor is a powerful and easy-to-use audio editing tool that offers a wide range of features such as cutting, splicing, mixing, and applying effects to help you create professional and quality audio recordings.
STEP 1 Select Target Audio Files
Choose "Audio Editor" in the "Tools" section. Drag and drop your target audio files to the area or import files by clicking "Open" to browse your local folders and then add files. After selecting the audio you want to edit, the editing window will pop out.
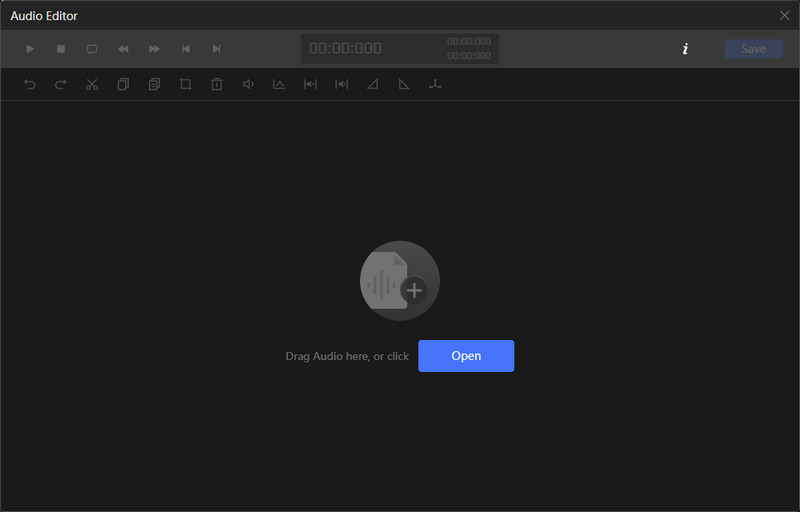
STEP 2 Edit Audio and Save
Use the toolbar above the window to cut, splice, or mix the audio, etc.
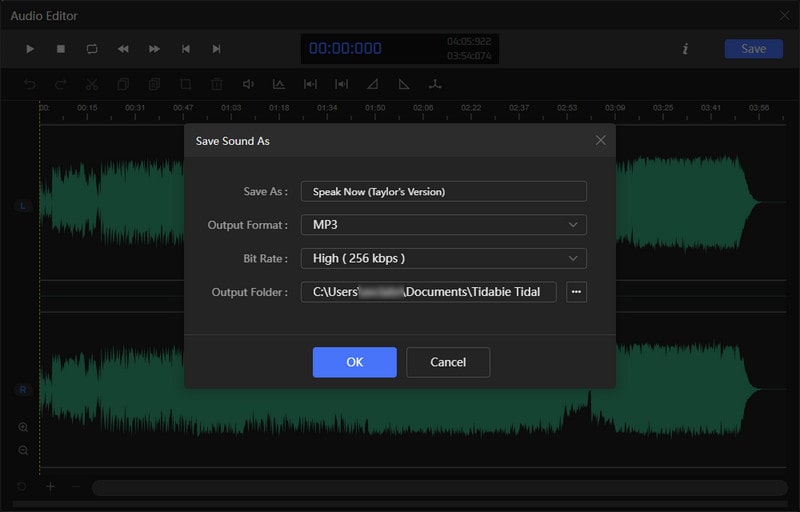
STEP 3 Select Output Settings
Change the file name, output format, bit rate, and output folder according to your references. Click "OK" to save the audio and wait a few seconds. The folder with your edited audio will be automatically opened.
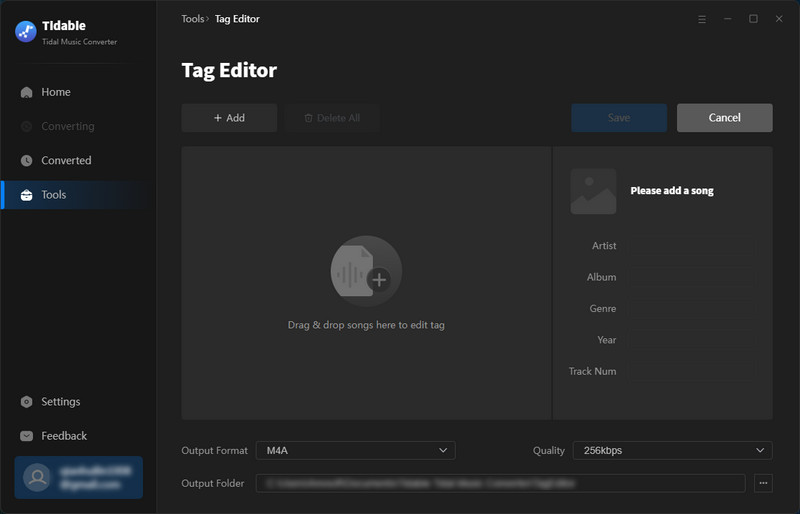
Part 3.5. Tag Editor
Tag editor is the tool that allows you to manually add tags to your local audio files or modify the ID3 tags of the converted files to your preference. Here are the steps to use it.
STEP 1 Select Target Audio Files
Select Tools and then choose "Tag Editor". Drag and drop your target audio files to the area or import files by clicking "+Add". Tidabie will automatically read the tags of your audio. If you want to edit the converted Tidal songs, head to the "History" tab, pick the items, and select "Edit Tags" after clicking on the above menu icon.
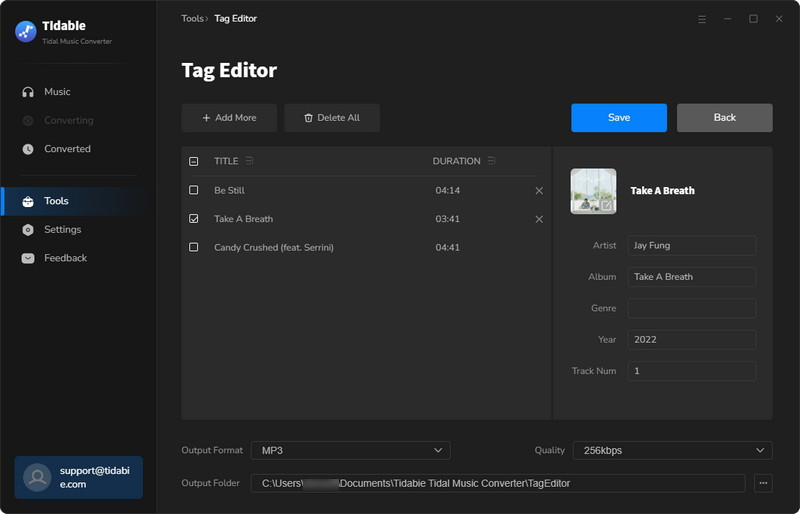
STEP 2 Edit ID3 Tags and Save
Click on the item you want to operate. Then you can change the Artwork, Title, Artist, Album, Genre, Year, Track Number, and other ID3 tags. Finally, click on "Save". And you can see the changes on the output file from your local computer.
Part 3.6. Export to iTunes
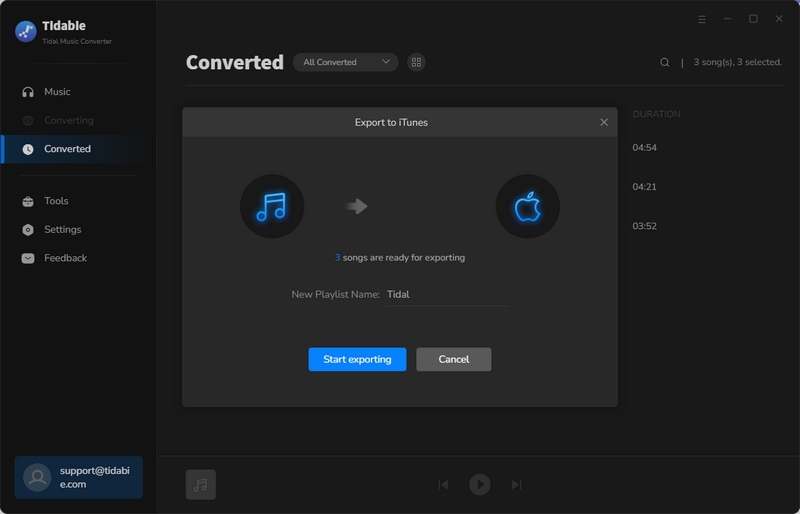
Except for the above tools, Tidabie provides you with a short transfer to iTunes, allowing you to transfer the converted Tidal songs to your iTunes library with a few clicks.
STEP 1 Select Target Converted Tidal Songs
After the conversion is complete, you need to go to the "History" module. Select the target Tidal songs, click on the four-square menu icon above the items, and select "Export to iTunes".
STEP 2 Start Exporting Tidal Songs to iTunes
After the previous selection, a pop-up window will appear. You are allowed to name this playlist accordingly. Then click on "Start exporting" to begin the transfer.