Menu
How to Add Apple Music to GarageBand
GarageBand, created by Apple, is an unmissable app for music creators who would like to make music in an easy-to-learn way. Moreover, you may have heard that GarageBand released some remix sessions for users to rearrange and add new elements to the songs, letting their creativity run wild. If you are interested in remixing music using GarageBand, don't miss out on this article. We will offer a detailed guide on how to add Apple Music to GarageBand for mixing here and we believe you will be inspired after reading this guide.
Part 1. What is GarageBand?
To start off, let's take a quick look at GarageBand.
GarageBand is accessible on iPhone, iPad, and Mac, allowing users to create music on the go. It includes features such as audio recording, adding loops and instruments to music, and remixing. GarageBand offers a wide range of musical instruments like pianos, guitars, drums, and voices that you can use to create your own music. Additionally, it provides a variety of sound effects and editing tools to enhance the music production process. It is a comprehensive, user-friendly, and free-to-access tool that is suitable for both music creation beginners and experienced musicians.
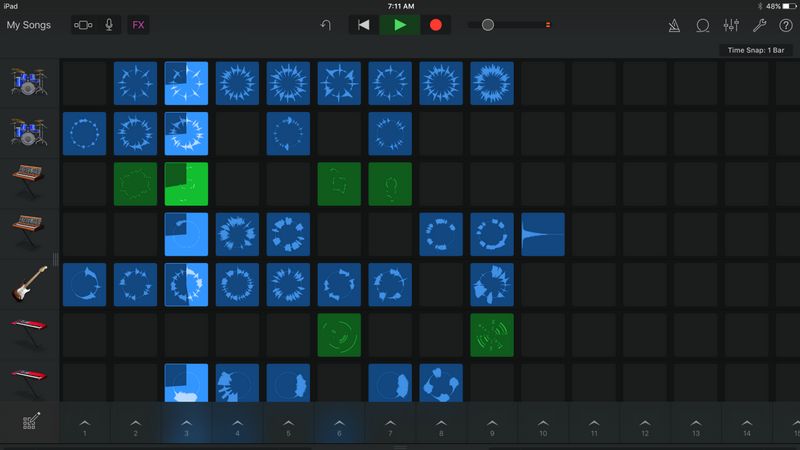
As aforementioned, GarageBand supports remixing songs. This amazing app enables you to edit songs using various musical instruments on an intuitive panel with no hassle. However, have you ever been in this situation: When you try to add a song from Apple Music to GarageBand for remixing, the songs on the browsing windows grey out and you fail to drag and drop it to the audio track.
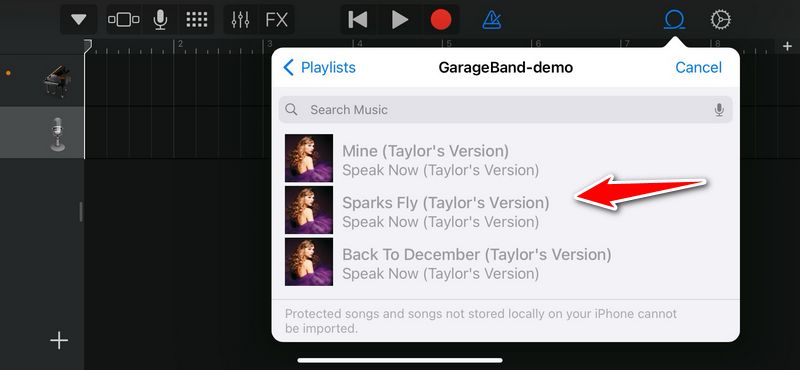
Why would this happen? The reason is that the songs you chose are protected songs or songs not stored locally on your device. And that's why they cannot be imported into GarageBand. Then, how to fix it? First, you need to know that the so-called protected songs are encrypted files from Apple Music. Hence, to address this issue, you may convert the songs from Apple Music into unencrypted files or convert them into local AIFF, WAV, AAC, or MP3 files, which are supported on GarageBand.
Now that we have a feasible solution, how do we implement it? No worries! Tidabie Music Go is here to help! Now, let's move on to the next part to see how to use Tidabie Music Go to download songs from Apple Music and save them to formats that are compatible with GarageBand.
Part 2. Convert Apple Music to Supported Formats on GarageBand
Tidabie Music Go is a comprehensive music converter designed for downloading music from major streaming services like Apple Music, Spotify, YouTube Music, etc. This amazing tool is a game-changer that enables you to download music from Apple Music at 10x conversion speed while preserving original audio quality. With music being downloaded and saved to PC in common formats like MP3, AAC, WAV, FLAC, AIFF, or ALAC, you can boost your creativity in music by applying the music files to multiple audio editing programs like Serato DJ, ShotCut, and GarageBand. More key features of Tidabie Music Go are as follows:
Tidabie Music Go
- Download songs, albums, playlists, and podcasts from Spotify, Amazon Music, Apple Music, TIDAL, YouTube Music, Qobuz, SoundCloud, etc.
- Convert music to MP3/AAC/WAV/FLAC/AIFF/ALAC.
- Run at up to 10x speed & keep full ID3 tags.
- Free access to AI Audio Splitter.
- Keep downloaded music for offline playback on any device.
- Enjoy podcasts online and download podcasts at no cost.
- Listen to radio shows and record radio freely.
Next, let's see how to use Tidabie Music Go to download and save songs from Apple Music to formats supported on GarageBand.
STEP 1 Launch Tidabie Music Go and select "Apple Music" under the "Recommend" column from the "Music" page. As the built-in Apple Music web player pops up, log in to your Apple Music account. Tidabie Music Go offers 2 options from which to record music, namely the Apple Music web player and the iTunes app(or the Music app for the Mac version). We recommend the Apple Music web player option for there is no need to install an extra app (the iTunes/Music app) and it supports downloading songs from Apple Music at up to 10x.

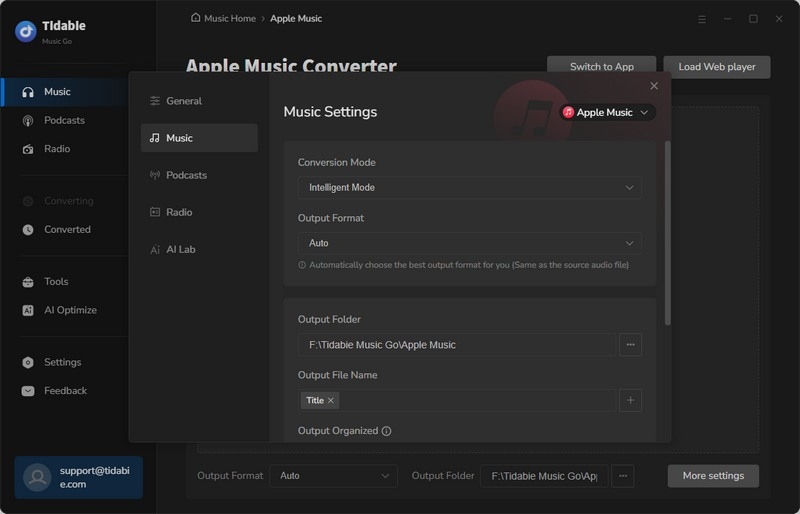
STEP 2 Before downloading music from the Apple Music web player, you need to modify the output parameters first. It is a must-step if you would like to import Apple Music to GarageBand. Go to the "Settings" section and change the output format to AIFF, WAV, AAC, ALAC, or MP3 as the audio files in these formats are allowed to be added to GarageBand.
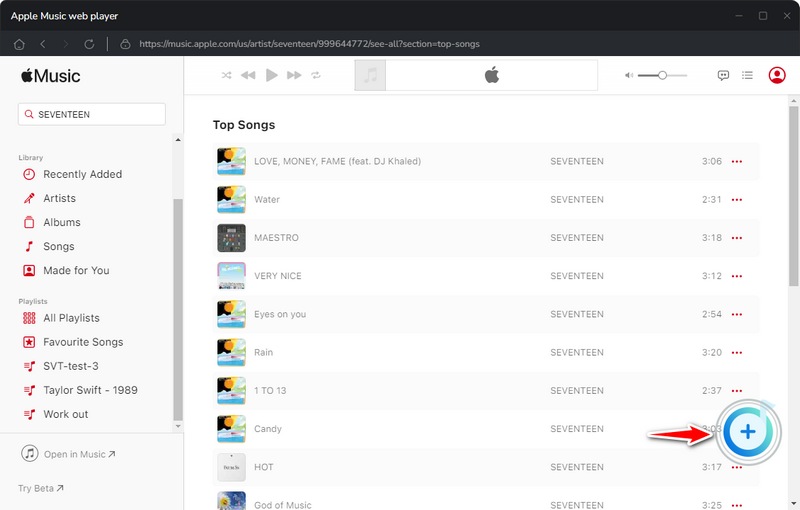
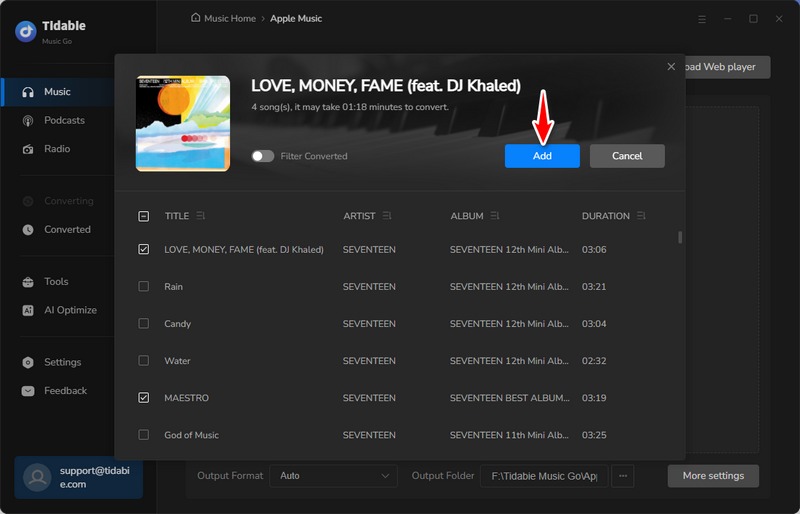
STEP 3 Provided that you finish customizing output parameters, you may go to the embedded Apple Music web player to choose songs to download. Find the songs you need to download and hit the "Click to add" button in the lower right. Then, check the box of your preferred tracks and hit "Add". You can batch-download multiple songs at once from different playlists if required.
STEP 4 Click "Convert" when everything is ready. Next, just wait patiently until the downloading is completed.
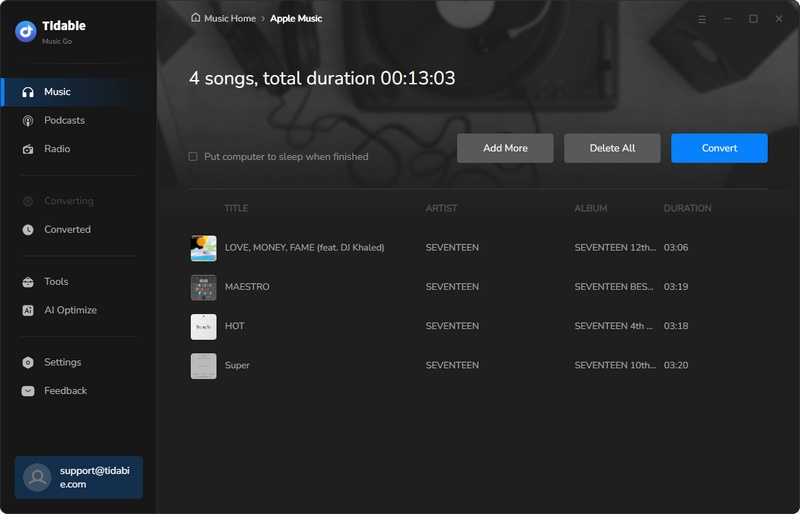
STEP 5 Navigate to the "Converted" module to check the downloaded Apple Music tracks.
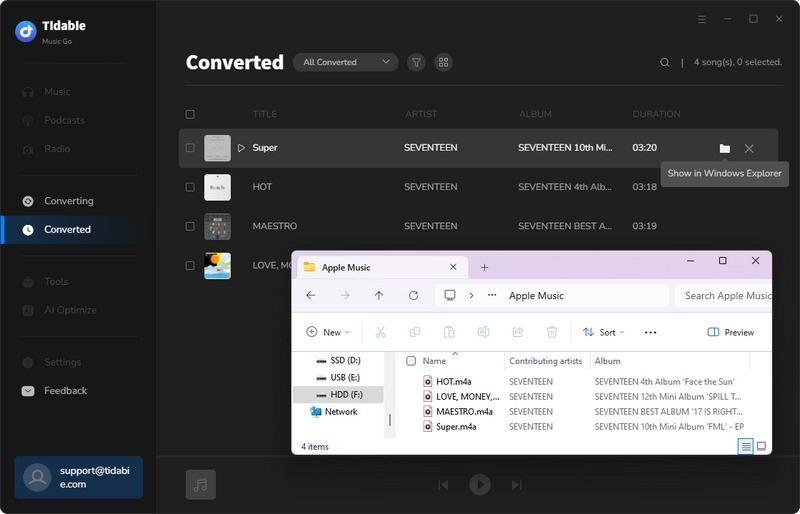
At this point, you have completed most of the work. As long as the music files are imported to your Apple devices, these files can be added to GarageBand easily. Just read on to the next part, which is crucial to finish adding Apple Music to GarageBand on iPhone, iPad, or Mac.
Part 3. Add Apple Music to GarageBand on iPhone/iPad/Mac
1. Add Apple Music to GarageBand on iPhone or iPad
STEP 1 Upload the downloaded Apple Music tracks to the cloud(eg. Dropbox).
STEP 2 Find the uploaded music files on the cloud. Tap on the three-dot icon near the song title > "Save to device" > "Save to Files" > "On My iPhone" > "GarageBand for iOS" > "GarageBand File Transfer".
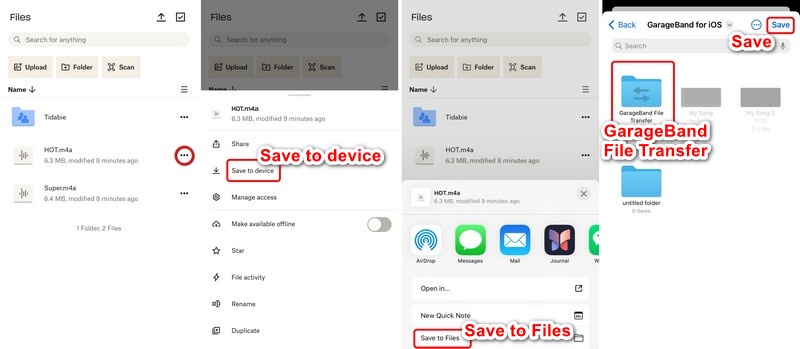
STEP 3 Open the GarageBand app on your iPhone or iPad. Create a new project. Then, hit the ![]() icon in the upper right corner. You will see the Apple Music tracks have been added to GarageBand successfully. Just drag and drop the song onto the audio track.
icon in the upper right corner. You will see the Apple Music tracks have been added to GarageBand successfully. Just drag and drop the song onto the audio track.

2. Add Apple Music to GarageBand on Mac
Similarly, before adding Apple Music tracks to GarageBand on Mac, you should make sure that the songs are saved on your Mac computer locally. If you are running the Windows version of Tidabie Music Go, just transfer the downloaded Apple Music songs to your Mac by cloud or any other feasible way. On the contrary, if you are running the Mac version, then your Apple Music tracks are downloaded to your Mac locally by default. Hence, you may add them to GarageBand directly in the following steps.
STEP 1 Open the GarageBand app on your Mac and create a new project.
STEP 2 Add a new audio track. Right-click on the track panel and choose "Add Audio File". Find the local music files of the downloaded Apple Music tracks and click "Open". Then the song will be imported to GarageBand successfully.
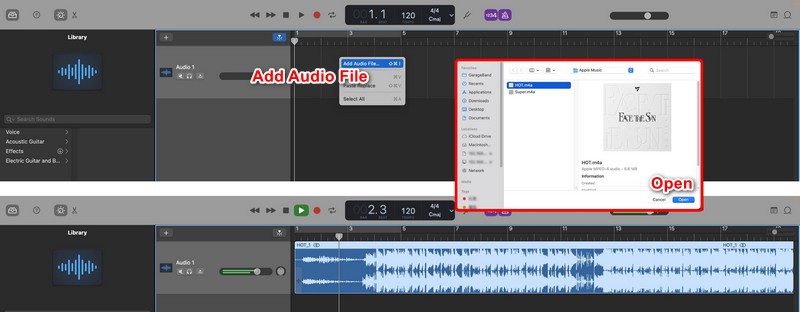
Now, you can remix the song to your preference.
Conclusion:
In this article, we find out the reason for the issue of adding Apple Music to GarageBand not working, and offer a feasible solution to fix it. If you are encountering the same issue, do not hesitate to let Tidabie Music Go to address the problem. This reliable tool is the optimal choice for you! Now, click the "Try It Free" button below to start your free trial!
Jacqueline Swift | Senior Writer
Jacqueline is an experienced writer and a passionate music aficionado with over 5 years of experience in the industry. She provides in-depth reviews and valuable insights on leading music platforms, as well as practical guidance for playing music across various devices in her articles.
Related posts

